Raspberry Pi Dongle
You can turn your Raspberry Pi, Pi Zero or other device into a USB connected device. Plug it in into a USB port, share an internet connection and work with a headless device, directly from your Notebook. Here's how.
Setup a New Image
You want to start with a new Pi image. To burn a new image, follow our guide: Setup SD Card
Don't unplug yet. Apart from standard configuration, you will need to edit a few configuration files.
Edit Image Configuration Files
To allow communication via USB, you need to modify 2 script files:
- Edit the
config.txtfile
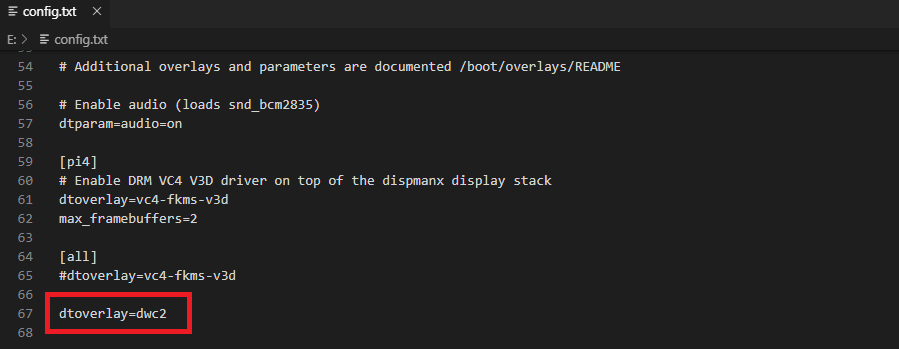
Append this line to the end of the configuration file:
dtoverlay=dwc2
Your config.txt will look similar to this:

- Edit the
cmdline.txtfile
This is a bit tricky in doing an exact modification: Just after rootwait, insert the below text, making sure there is exactly 1 space in between.
modules-load=dwc2,g_ether
On our version, the content, with the (highlighted) inserted text may look like this:

- Safely remove the SD card and insert it into your Pi
Install Bonjour
Your Pi would now be accessible via an IP address. If you don't want to have to remember it, you don't have to! Current versions of Raspbian include and automatically enable Avahi, which allow you to use names like devicename.local.
Windows doesn't have native support of this feature. The easiest way to have such functionality is to install Bonjour Print Services. Go ahead and download and run the installer. If you have installed iTunes, you probably don't have to - the Bonjour Print Services are already installed.
Now your fresh install is available under raspberrypi.local. Once you change your hostname, remember that the address will change to yourhostname.local.
Startup
At this point in time, everything is ready to run your new system and configure networking.
- First, insert the new Dongle into an empty USB slot and wait a bit. The Pi leds will tell you, when the system is booted and you can continue. Check our Raspberry Pi LEDs article, if unsure.
- SSH into your Pi. For more details, you can read-up here: Remote Access to Raspberry Pi. The hostname is:
yourhostname.local
If you followed the guide so far, you would type
raspberrypi.local
Congrats - you have access to your Pi, albeit without network connectivity (if you hadn't setup wifi access).
Setup Network Sharing
The final step is to setup network sharing.
- Open
Control Panel->Network Connections(or simply type 'network connections' in Windows Explorer) - Right-click the network currently used by your notebook
- Select
Properties - Select the
Sharingtab - Check
Allow other network users to connect through this Internet connection - Select the network to be shared (i.e. your Pi network)
- Click
OKand close
To test the connection, you might want to go back to your terminal and type
ping www.google.com
Note: you might need to restart the terminal for the changes to take effect
- Done. You have a connected Raspbian Linux, available for testing or serving data or anything else.