
Docker IoT Device
This Docker configuration creates an IoT Raspberry Pi device as a foundation for IoT development in our makerspace. Before using Docker, we configured our devices the hard way - see our original configuration here: IoT Raspberry Pi Device. The same can be achieved using Docker and Docker Compose, which is described in this document. Choose the alternative you feel more comfortable with.
If you want a really fast installation of MQTT/Node-RED, you might be interested in a faster way to achieve this: see our Node-RED on Docker article; you can use our guide under Option 3, instead of the, more traditional, guide below.
Project Overview
This repository allows you to run both Raspberry Pi IoT devices, as well as PC IoT devices. The Docker Compose files are in the appropriate directory:
- iot_device: This folder contains a docker compose file for development on your PC
- iot_device_rpi: This folder contains a docker compose file for development on Raspberry Pi
Folders differ only slightly (basically they contain the same compose file) - images used target different platforms only. The remaining setup (data, configuration) stays the same for both platforms
We also manage all images on the Raspberry Valley Docker Hub
Docker Images Used
For the Pi, we have rolled out our own images. Those are inspired by community work, with a little twist here and there to suit our makerspace needs.
- Mosquitto for Raspberry Pi
- Node-RED for Raspberry Pi - this image is common to both PC and Pi version (just use the appropriate tag for each)
For the PC, we are using more official images:
- Mosquitto (eclipse) - The official image
- Node-RED - this Raspberry Valley image is common to both PC and Pi version (just use the appropriate tag for each)
Running the Compose file on Raspberry Pi
In order to get our IoT Raspberry Pi Device running, follow the steps below:
- Login via terminal to your Raspberry Pi
- Clone our repository to your machine
- Make sure Docker and Docker Compose are installed (we have a guide here)
- Navigate to the folder iot_device-rpi
- Run the following command:
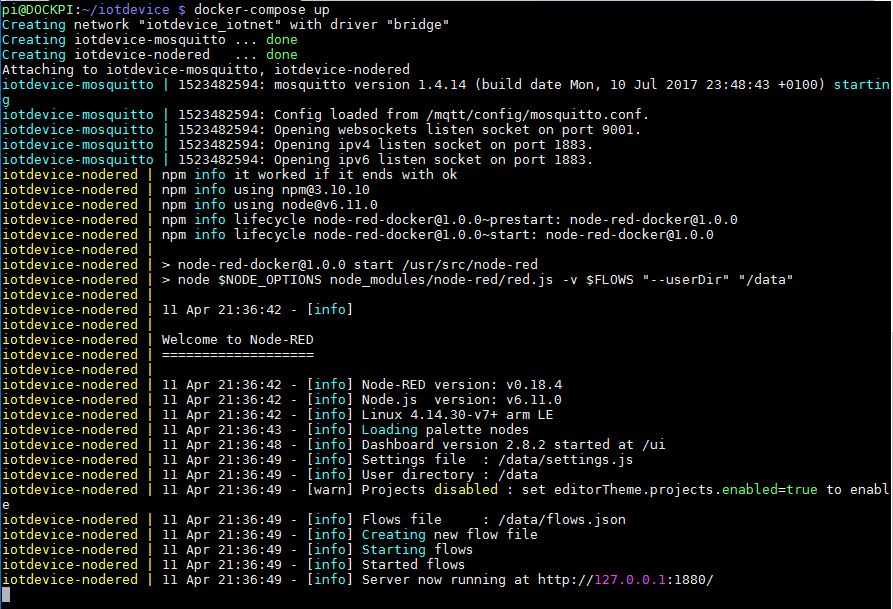
docker-compose up
Your device is now started, volumes created if needed etc.
- Test your device: fire up your browser and connect to your Pi. This opens up Node-RED running from your device. To learn more, read our article: Node-RED
http://your-pi-ip-or-hostname:1880
The Node-RED dashboard is also included in this distribution. Test is as well, using your browser, by typing the URL below. Learn more about the dashboard in our article: Node-RED Dashboard.
http://your-pi-ip-or-hostname:1880/ui
Running the Compose file on your PC
The setup on your PC is slightly more simple. We assume you have Docker already installed (on Windows, Docker Compose is installed automatically, unlike on the Pi).
The point is, you can develop your flows from your PC, then easily port them to your Pi. The systems are compatible.
- Clone our repository to your PC
- Navigate to the folder iot-device
- Run the following command:
docker-compose up
Or if you want the containers to run in the background:
docker-compose up -d
Your device is now started, volumes created if needed etc.
- Test your device: fire up your browser and connect (notice you will be connecting to the localhost, instead of your PI):
http://localhost:1880
The Node-RED dashboard is also included in this distribution. Test is as well, using your browser:
http://your-pi-ip-or-hostname:1880/ui
There are multiple ways to stop the containers in our IoT Device. Here is one option:
docker-compose stop
Cleanup
To cleanup the device, run simply the following command. It works the same on PC or Pi.
docker-compose down

Note: Please notice the cleanup does not remove or destroy your volumes. For obvious reasons - you can re-use them later: your configuration and work stays safe.
You can test what remains by running
docker images
docker ps -a
docker volume ls

Implementation Notes
- The directory name of this project is key: it is pre-pended to volume names, network names etc. You can override this feature by launching docker-compose with the -p parameter if you want a different prefix
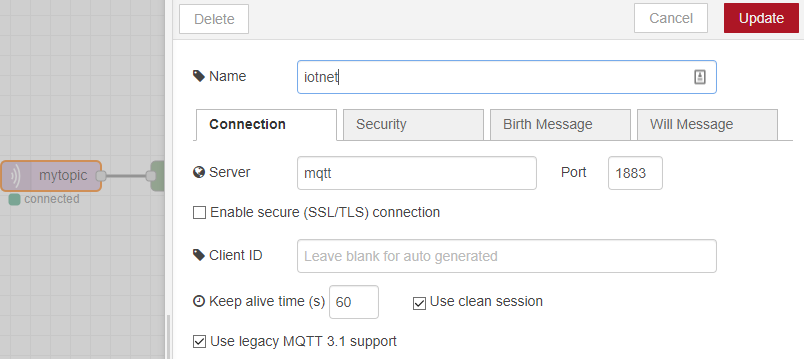
- hostname is different than localhost! As opposed to what you might be used to, the Node-red MQTT nodes will not connect to 'localhost' as hostname. This is because of the Docker network and machine hostnames created by the compose file. Check the name of the mqtt service, this is your hostname. In our case mqtt
- In the examples above, we assume that you are debugging and testing the services. The containers WILL NOT restart after reboot. You can either modify the compose file by adding a restart option to each service (see below example), or run the command with an autostart script.
...
mqtt:
    restart: always
    image: "eclipse-mosquitto"
...
Links
- Docker on Raspberry Pi (includes also notes for setting up Docker Compose)
- Node-RED on Docker - Learn more on rolling out Node-RED with Node-RED Dashboard
- IoT Raspberry Pi Device - Setup an IoT device manually (alternative to the approach described in this document)
- Docker IoT Device (Github)
- Our Raspberry Pi Mosquitto image (Github) - for PC development, we use the official eclipse image: eclipse-mosquitto
- Our Node-RED Docker image (Github) - targets both PC and Raspberry Pi