
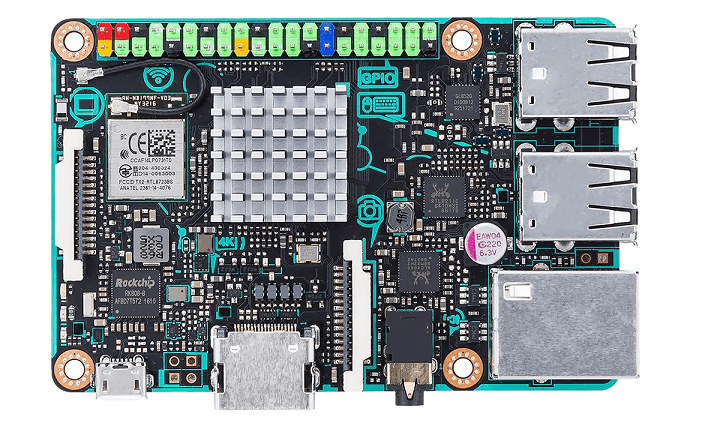
Asus Tinkerboard
We test the Asus Tinkerboard in our makerspace. There's a simple reason behind: it is similar in form factor to the Pi (you can use many accessories, cases etc. designed for the Pi), and it has much more power. So if your Pi based server is struggling with load, chances are the Tinkerboard won't.
This page summarizes some of our experiments with the device.
NOTICE: This page is under construction. We are investigating the device and it's usage. Work in progress. Please come back regularly, you'll find updates as we try out things.
Asus Tinkerboard Introduction
As we said in the introduction, the board is really a more powerful device, compatible with the Pi. This is exactly what we need. Having said that, our first impression was mixed: we loved the power, and yet we were a bit dissapointed by the size of the community - simply, we are spoint by the Pi support, community, sheer amount of recipes etc. This is actually not bad and you can (and should) get started; it's worth the effort.
To highlight the main differences, the TinkerBoard has caught our attention due to:
- 32-bit ARMv7 quad-core processor
- 2GB of onboard RAM
- Gigabit Ethernet
- Re-use of Raspberry Pi accessories
To learn more, go to the specifications page.
Installation
There is a plethora of OS images available for the board. You might want to check what image is of interest to you and download the image, flash it and follow the appropriate instructions for your distro. Image links are below in the Links section, under Available Images. Done
For the use of Raspberry Valley, we opted for 2 options: The official TinkerOS, and later for the amazing Armbian, which is, at this point in time, our installed distro. It's hard to provide tips for all images, however most recipes are similar. Try the sections below on your system of choice, they will probably work, or need the minimal modifications. Google is your friend in this.
Installing Docker
For multiple reasons, we choose to install Docker very early, and run our solutions on top. You can find details about Docker in our article Docker on Raspberry Pi; installation is very similar on TInkerOS etc., if not the same. One point of interest - Docker Compose installation might need some more tweaking.
Here is the command to get Docker going:
curl -sSL https://get.docker.com | sudo -E sh
Don't forget to setup your user as well:
sudo usermod -aG docker YourUserName
Refer to our article Docker on Raspberry Pi to learn more.
USB Boot (Armbian)
We are using an Armbian flavored setup, with and attached USB storage, as a server (GitLab on Docker).
If you wish to to transfer your system to the USB HDD, and boot from there, here is a one-liner which enables this on Armbian. So instead of tweaking things and Googling around, just type the below and follow the instructions. Neat!
sudo nand-sata-install
For other OS flavors, you can try our guide for Raspberry Pi - Transferring System to USB - which is rather applicable with tweaks to your choice of OS. So handle this as a general guide and search for tips for your OS flavor.
Links
- Asus Tinkerboard Home
- Inkerboard Community
- Available Images - here's the offering of official images for the board (including Android). For more details, you can also visit the Elar Systems Tinkerboard OS Offering and further the armbian offering
- Getting Started with Ubuntu on the ASUS Tinker Board