
Python Development Environment
This page describes in more detail, how to easily setup your Python development environment on Raspbian.
Check out our main Python page for more interesting links and ideas.
Please note: At the Raspberry Valley makerspace, we will use Python 3 only (Python 2 is coming to an end anyway and essentials libraries are upgraded). Together with Python 3, we always use Virtual Environments. This guide works for your recent Raspbian, as well as other systems; Ubuntu or even Windows Subsystem for Linux.
If you feel you want to take the environment thing to the next level, you may also consider this guide: WSL - Python Development Environment.
The below guide works great and is still valid for anybody. It is actually a very straight-forward way to get easily started with setting up your Python things, without worrying too much about system, and focusing more on code.
For some, the described virtualenvwrapper allows a very convenient workflow for Python development. Other developers are used to different virtual environment approaches and workflows. We have to admit, that we have already abandoned the approach described below, and have 'improved' our workflow by using the excellent pyenv. It's up to you to choose.
We will start with a fresh install of debian. As of this writing, it has Python 2.x with Pip, Python 3.x with Pip. Please note down the current versions.
python --version
pip --version
python3 --version
pip3 --version
At any time, you might also simply check available versions of Python by running the below list printout:
ls -l /usr/bin/python*
You might want to also check an exhaustive description of other ways to find Python on your system at linuxconfig.org
Note: on the Windows Subsystem for Linux Debian, only Python 3.x is installed, together with pip3. Recently, we have also seen a debialn WSL, which was installed with no Python at all. In that case, you need to run the Python installation first:
Install Python (skip, if Python is present already)
sudo apt update
sudo apt install python3 python3-pip
Follow individual steps below to setup your environment.
Install basics
We assume Python and pip are already installed, see previous note.
- update and upgrade
sudo apt update && sudo apt full-upgrade
- Setup basic dependencies: We are building a development environment, so the below will come in handy.
sudo apt install build-essential cmake pkg-config
sudo apt install libatlas-base-dev gfortran
sudo apt install libhdf5-serial-dev hdf5-tools
Setup Virtual Environments
Setup Virtual Environments. Learn more in this excellent Python Virtual Environments Primer. With Python 3.x, most of your work is done; the venv module from the standard library is installed.
If you develop both on Raspbian and Windows, you can follow this guide to setup virtual environments on Windows. For Raspbian, follow the guide below.
- Setup a directory, where you will store your environments / code. In our examples, we will use
python-envsas the development directory, but of course you can apply your naming.
mkdir python-envs && cd python-envs
- Setup virtualenvwrapper to manage your virtual environments. The tooling of venv of course works perfectly, but you want to make your development more convenient, right?
pip3 install virtualenvwrapper
Tip: The location of virtualenvwrapper may differ, depending on how you setup the tool. If you ran it as we did, your installation is located in ~/.local/bin/. If you ran system-wide (with sudo), then the path to the wrapper is /usr/local/bin. Locate the correct location before going further - you might want to run the following to find the correct location:
which virtualenvwrapper.sh
Tip: on Windows, virtualenvwrapper won't work. Check the Windows specific version - virtualenvwrapper-win instead. If you prefer PowerShell, then it's better to install virtualenvwrapper-powershell instead.
- Update your console settings. You can update either the
~/.bashrcfile, or the~/.profilewith the settings below. Learn more about the difference between those 2 files here.
First, open up ~/.bashrc:
sudo nano ~/.bashrc
Attach the following to the end of the file (this will enable your sessions to setup correct paths etc.). You can read more about the configuration at the official pages here.
export WORKON_HOME=$HOME/.virtualenvs
export PROJECT_HOME=./python-envs
export VIRTUALENVWRAPPER_PYTHON=/usr/bin/python3
export VIRTUALENVWRAPPER_VIRTUALENV=~/.local/bin/virtualenv
source ~/.local/bin/virtualenvwrapper.sh
export VIRTUALENVWRAPPER_ENV_BIN_DIR=bin
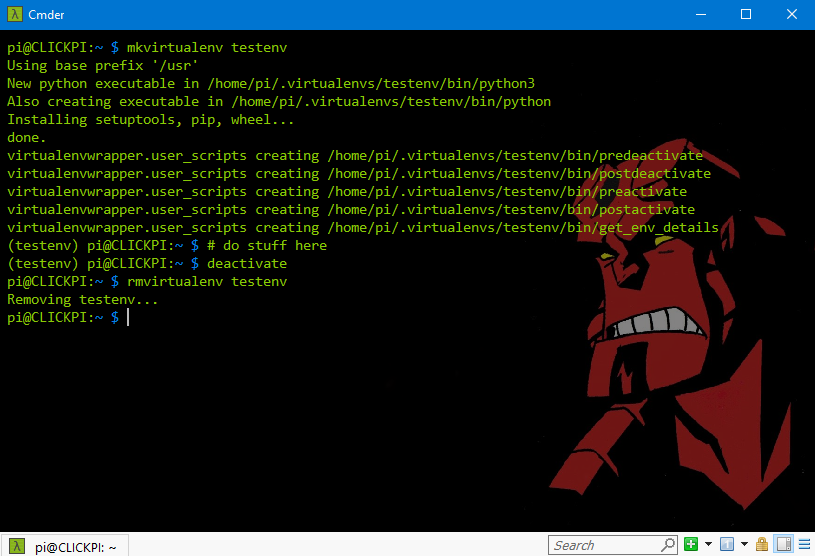
- Test the configuration (first please exit the terminal and logon again for the above changes to take effect): Try creating a dummy virtual environment to validate all works well
mkvirtualenv testenv
At this point in time, your new environment is created and activated. you can see the active environment on the command-line, in brackets.
Working with the environment boils down to basically using to core commands listed below. If you wish to know more, check the reference here.
- mkvirtualenv: used to create a new environment. We recommend to create one for every project you have
- workon: select the environment you wish to work with
- deactivate: unselect the environment you were using
- lsvirtualenv: list available virtual environments
- rmvirtualenv: remove an environment you no longer use
Below is an example of what can be your workflow with virtual environments.
Workflow
The above guide got you prepared to start a project. Now how you handle your development is entirely up to you. We think it is a good idea to have a simple workflow always on mind. For example:
- Setup a virtual environment for your project and activate it using
workon - Setup your git repository somewhere (github, gitlab, bitbucket, your own server ....) and synchronize it. We find it a good habit to setup the git repository meta-date right away: project description, icon etc.
- Add a .gitignore, README, CHANGELOG to your project
- in your activated virtual environment - install pre-requisites. What we install is the following:
- Sphinx to document your project from start
- Prospector to check the quality of your code
- Edit your code one feature at a time, then commit with a good descriptive comment
- once you are done editing, deactivate your virtual environment using
deactivate - repeat
Tips
- If you are using Visual Studio Code, your need to bind to the virtual environment you are working on. To do so, activate the Palette -
Ctrl+Shift+P, and use the featurePython: Select Interpreter.

Tips for complementing your Pi environment on Windows
Now if you run Windows, you'll be most probably setting up an environment for your Pi development on Windows as well. While you can probably get away with installing and using the excellent Anaconda for all your Python needs, we have not chosen to go this way. We prefer to setup an environment similar to our Pi, and way more lightweight.
Our installation does not depend at all on any system Python which might well have been installed (system is system and we don't touch), but instead we use pyenv-win as a starting point (for Linux boxes, you want to use pyenv instead).
If you are using pyenv as a virtual environment tool of choice, we recommend to add a nice plugin: pyenv-pip-update. This allows you to upgrade pip in all your environments at once, which is a rather common annoyance otherwise.
We do however recommend to setup your Python on WSL - Windows Subsystem for Linux. pyenv-win is not so straightforward, when it comes to virtual environments, while pyenv has amazing virtual environment support out of the box.
When using WSL and pyenv:
- Go ahead and setup the Visual Studio Code plugin Remote-WSL. This will allow you to run VS Code from your terminal, choose the right Python version and virtual environment, all in one go. Development bliss!
- Navigating around Windows mounted volumes in WSL can be annoying. You can simplify your work by keeping your files on Windows, and creating a symling to your WSL distro. For example, if you have created your development folder in
C:\mypython, use the below command to symlink this folder:
cd ~
ln -s /mnt/c/mypython
# add other symlinks you need in your day-to-day work, as needed
- it's a matter of choice on how you want to work with virtual environments. Many power users, developers and bloggers suggest solutions such as
pipenv,virtualenvandvirtualenvwrapperfor developing on WSL. Here's our tip - learn thepyenvinternal commands for working with virtual environments. While all the other suggestions are simply great and tested tools, we think simplicity helps
When using pyenv-win:
- We find it very helpful to NOT use the default installation location (in the userspace). Instead, we use pyenv on a separate drive / folder, to make it fully portable. The argument goes as follows: it takes time to setup everything to work as your workflow.
Links
- Python Virtual Environments Primer
- Managing Multiple Python Versions with pyenv
- pyenv for Linux, pyenv-win for Windows
Our Python related articles: