
MotionEye OS on Raspberry Pi
This is a gentle introduction to setting up a great camera monitoring system - motionEye OS on your Pi. If you want to create a security system, a wild-life capture system or a stop-motion video of your event, look no further. The motioneEYE OS distro is the right thing.
You might want to modify the guide to meet your requirements. For a Pi Zero, or Pi Zero W, you might want to get inspiration from a great tutorial on the Octocam - it is aimed at the Pi Zero W, but with a small abstraction, it will help you get started with any other device.
Would you prefer to have a streaming service withoout a front-end, try our Streaming Video with Motion guide instead.
Installation
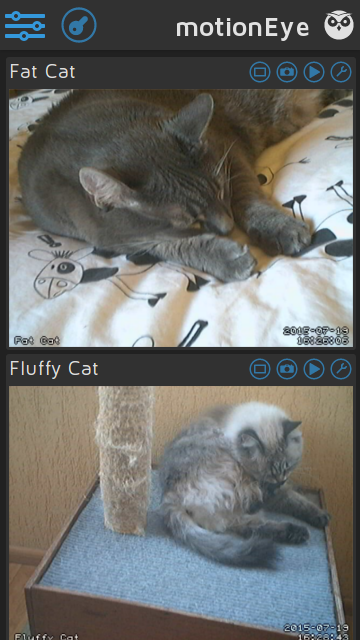
The motionEye OS allows you to setup a motion-triggered security camera which captures pictures or videos, let's you view them on your device, connected computers or even upload to the cloud. Apart from advanced features like network video streaming, webhooks (for services like IFTTT, Dropbox, you can also setup a simple monitoring station with multiple devices connected to one dashboard.
motionEYE OS image
motionEye OS is a complete operating system for your Pi. It is actually based on a Pi distro: you simply write it to your SD card, configure on first run and you're ready to go. You might want to consider using a larger SD card for storage (a lot of pictures and videos are potentially taking up space), but that depends on your configuration. Maybe you just want to upload to the cloud and forget local storage.
We have a separate guide on writing an image. So go and download the latest motionEye image and write it to your SD card.
NOTE: there are multiple images available. Choose the one which fits your device. It might not be clear at first sight, but if you have a Pi Zero or Pi Zero W, use the plain old motioneyeos-raspberrypi-xxxxxxxx.img.gz version.
Don't eject the image yet, some configuration is needed
Image Configuration
Configure the image (SD card) by following our guide Setup SD Card. Just substitute the recommended Raspbian image download with the MotionEYE image you chose earlier.
Open a browser on your computer (or tablet, or phone), and type http://192.168.0.101, for example, replacing that IP address with the IP address of your device, into the address bar. If all goes well, you will reach the initial screen of motionEye OS.
Note: The default username is admin, the default password is blank (no password). It's a good idea to setup some credentials according to your liking
You're done!
Installing motionEye on Raspberry Pi
If you just want to run the OS described above, you're done. However, if you want to have MotionEye running on your Pi, and launch other programs as well, keep on reading.
First, head to motioneye github pages. The solution has great documentation and does allow you to install MotionEye in a breeze. Mind you, the installation is not completely trivial.
To install, follow this installation guide from the same page. You probably want to use a brand new image, again our article Setup SD Card is here to help.
Tip:
It might happen, that MotionEye doesn't recognize your camera. After checking the obvious reasons: properly connected, enabled in raspi-config, too little memory allocated (raspi-config) it might still not run.
The camera might not be recognized after you checked all the above. This happens on Lite installations as far as we have seen. In this case, here is a tip:
- Check the modules file:
sudo nano /etc/modules
- If not found, add the camera module to be launched (to the end of the file):
bcm2835-v4l2
- Save and reboot
Installing motionEey in Docker
We use Docker a lot. See more on our Raspberry Valley Docker page(s). You can get started rolling out Docker images for MotionEye by following the links below:
Links
Our video streaming articles: