
PiCAN2 CAN-Bus Board for Raspberry Pi
For development purposes, we have acquired 2 CAN hats for Raspberry Pi. Here is a brief documentation of PICAN2. CAN bus is not only an interesting topic for our makerspace, but is also heavily used in our machines. It's good to get acquainted with it - can't be easier with a Raspberry Pi.
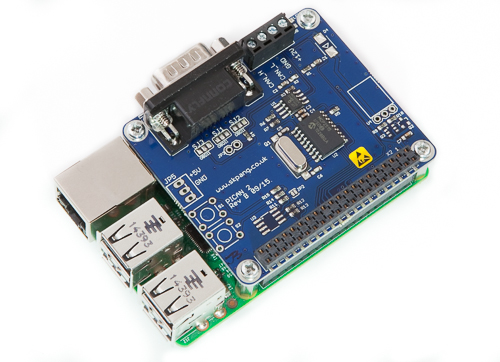
The PiCAN2 board provide CAN-Bus capability for the Raspberry Pi. It uses the Microchip MCP2515 CAN controller with MCP2551 CAN transceiver. Connection are made via DB9 or 3 way screw terminal.
Easy to install SocketCAN driver. Programming can be done in C or Python.
Features
- CAN v2.0B at 1 Mb/s
- High speed SPI Interface (10 MHz)
- Standard and extended data and remote frames
- CAN connection via standard 9-way sub-D connector or screw terminal
- Compatible with OBDII cable
- Solder bridge to set different configuration for DB9 connector
- 120Ω terminator ready
- Serial LCD ready
- LED indicator
- Foot print for two mini push buttons
- Four fixing holes, comply with Pi Hat standard
- SocketCAN driver, appears as can0 to application
- Interrupt RX on GPIO25
Installation
The attached documents ('Documentation' section below) give a good overview of installation and usage. Installing on a newer version of Raspbian however causes some issues, therefore we copy (and extend) some of the installation steps below. The installation steps are working on Raspbian Stretch (latest release as of this writing)
- Setup a brand new Pi. You can use some of our tutorials to do so (for instance our headless setup guide), or simply flash at least the Lite image to your SD card
- Update and upgrade (see Updating Raspberry Pi)
- Add overlays (this step differs from the original Jessie documentation)
Edit the config.txt file:
sudo nano /boot/config.txt
Then add the following 3 lines to the bottom of the file:
dtparam=spi=on
dtoverlay=mcp2515-can0,oscillator=16000000,interrupt=25
# the line below is modified for Stretch
# dtoverlay=spi-bcm2835-overlay
dtoverlay=spi-bcm2835
- Reboot
- Download and install Can-utils. The steps from the utils homepage are not reproduced here. Just follow them from the homepage.
If Can-Utils installation fails: if the installation doesn't finish, you have some pre-requisites missing. Basically you need to install the following:
sudo apt install automake autoconf
- Setup a loopback device for testing. The steps are nicely reproduced here