
Raspberry Pi Tor Access Point
This is a guide to setup a Raspberry Pi 3, acting as an Access Point and Tor router.
Background
Tor is short for The Onion Router, and was initially a worldwide network of servers developed with the U.S. Navy that enabled people to browse the internet anonymously. Now, it's a non-profit organization whose main purpose is the research and development of online privacy tools. If you want to be anonymous (for example if you live under a dictatorship, you're a journalist in an oppressive country, or a hacker looking to stay hidden from the government) — Tor is one of the easiest ways to anonymize your traffic. It might not be perfect (and can be infiltrated) and it does slow down your browsing, but hey, free speech is worth the effort to look into it. Learn more at the Tor Project homepage.
The Raspberry Pi can be used as a wireless access point, running a standalone network. This can be done using the inbuilt wireless features of the Raspberry Pi 3 or Raspberry Pi Zero W, or by using a suitable USB wireless dongle that supports access points. The idea is to have a separate wireless network all your devices can log int, and then use an available Lan connection to serve networks to your devices from one point. Excellent at dorms, hotels, separating network traffic (say for IoT devices) etc.
This article combines the two: we will setup a Raspberry Pi as an access point, then filter all internet traffic via Tor. So if you want to browse anonymously, you simply connect your device to a different network, and the Pi does take care of the rest. The approach was tested on a Raspberry Pi 3, but will work on most models.
Here is the network flow overview:
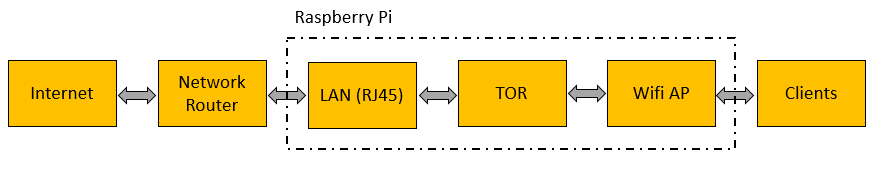
Installation
We are re-using great work done by the community. Our tweaks are minor - related to the Buster Raspbian release which is not fully working with the original approach. A big thanks goes to:
- Gist by fire1ce - not updated anymore
- Wireless Hotspot Script - works out of the box, but hostapd won't start on Buster. Read on to find the fix we use
Please find the whole installation guide below; as mentioned, the original work is done by fire1ce and our modifications and comments are inserted into the original gist.
If some individual steps are unclear, you may visit other articles we have which describe a problem in more detail:
- burn image to SD card: learn more here - Setup SD Card
- SSH TO Raspberry Pi: learn more here - Remote Access to Raspberry Pi
- Using Git: learn more here - GIT
After running all commands, you will have a brand new access point on the IP range of 192.168.42.x, with a tor gateway enabled. This network will utilize the local LAN to transfer traffic through your RJ-45 connector.
# -- Download Rasbian Lite (latest version) from: https://www.raspberrypi.org/downloads/raspbian/
# -- Burn Image to SD-Card
# -- Boot Raspberry Pi 3

sudo apt-get update && sudo apt-get upgrade && sudo apt-get install git
sudo raspi-config
# -- Change User Password
# -- Enable SSH In Interface Options
sudo reboot

# SSH TO Raspberry Pi 3

git clone https://github.com/unixabg/RPI-Wireless-Hotspot.git
cd RPI-Wireless-Hotspot
sudo ./install

# -- "Y" to agree to terms
# -- "Y" to use preconfigured DNS
# -- "Y" to use Unblock-Us DNS servers
# -- "N" for WiFi defaults
# -- Type in a new WiFi password (it will be checked)
# -- Type in a new SSID
# -- Type in your desired WiFi channel (1, 6, 11)
# -- Type "N" when asked - "Are you using a rtl871x chipset?" --
# -- Type "N" for chromecast support (unless you plan to use a chromecast w/RasTor)

# reboot below is optional / the script reboots automatically now
sudo reboot
sudo apt-get update && sudo apt-get upgrade

# at this point the hostapd will fail !!! to confirm, check the logs. If you see the error
# 'hostapd is masked', then run the below 3 commands. Otherwise ignore the below 3 commands.

sudo systemctl unmask hostapd
sudo systemctl enable hostapd
sudo systemctl start hostapd

# at this point, on a new reboot, you will see an extra boot error:
# 'failed to start dhcp services' ...
# no action required for full functionality

# -- Connect to Your new SSID with a Phone and check if you have full Internet Connection.

sudo apt-get install tor
sudo nano /etc/tor/torrc

# -- Add the following just below the first set of comments:

Log notice file /var/log/tor/notices.log
VirtualAddrNetwork 10.192.0.0/10
AutomapHostsSuffixes .onion,.exit
AutomapHostsOnResolve 1
TransPort 9040
TransListenAddress 192.168.42.1
DNSPort 53
DNSListenAddress 192.168.42.1

# -- iptable routes:

sudo iptables -F && sudo iptables -t nat -F
sudo iptables -t nat -A PREROUTING -i wlan0 -p udp --dport 53 -j REDIRECT --to-ports 53
sudo iptables -t nat -A PREROUTING -i wlan0 -p tcp --syn -j REDIRECT --to-ports 9040

# -- Check your routes:

sudo iptables -t nat -L

# -- if all routs looks like about:

sudo sh -c "iptables-save > /etc/iptables.ipv4.nat"

# -- Create log file:

sudo touch /var/log/tor/notices.log
sudo chown debian-tor /var/log/tor/notices.log && sudo chmod 644 /var/log/tor/notices.log

# -- Start TOR:

sudo service tor start

# -- Check to see if the service is running:

sudo service tor status

# -- Run TOR Service at Boot:

sudo update-rc.d tor enable
sudo reboot

# -- Test for TOR service is running after reboot, connect to the WIFI.
# -- DONE -- #


# -- Optional: Install Monit Service to reload Tor Serivce if Down

sudo apt-get install monit
sudo nano /etc/monit/monitrc

# -- add those lines to the end of the config:

check process gdm with pidfile /var/run/tor/tor.pid
   start program = "/etc/init.d/tor start"
   stop program = "/etc/init.d/tor stop"

# -- realod and add Monit to startup
sudo monit reload
sudo update-rc.d monit enable
Alternatives
Tor networking and Pi are close together. There are many interesting solutions out there which achieve basically the same as we did above. This section lists the notable ones we tried out.
- TorBox - You can just download the image and flash it and everything works like a charm. We appreciate the fact that the authors provide a guide to create your own box: after all trusting internet images is not such a good idea
Links
- Original Gist - One of the best guides we found, however doesn't fully work for Raspbian Buster. Our article highlights the needed updates
- Tor Project
- RaspAP Wifi Hotspot - Our article on setting up a hotspot (without Tor), using a much easier approach by downloading a pre-made AP software