
CoAP - Getting Started
Constrained Application Protocol (CoAP) is an upcoming Internet Application Protocol for devices running on constrained networks (such as lossy networks and/or low-power networks). It is very similar to traditional REST protocols.
So why should we care? By installing CoAP on your Raspberry Pi allows you to hack interesting hardware, for instance home appliances from Ikea (see review here) - so called IKEA Trådfri (Tradfri). And more.
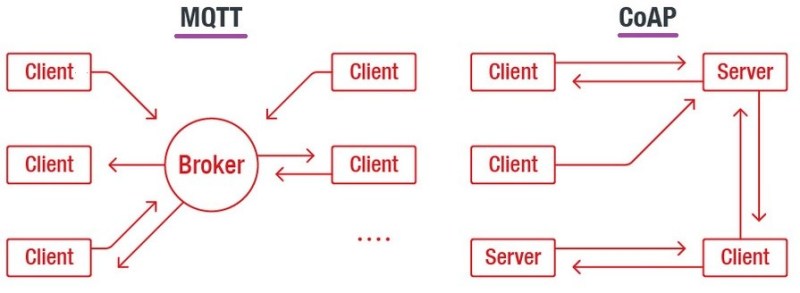
We've been using MQTT much more in our solution, however CoAP comes in handy for others - especially when you connect to 3rd party CoAP devices, or want to run more light-weight. Below is a simple schematic showing the difference between MQTT and CoAP. If you wish to learn more, see our MQTT on Raspberry Pi getting started guide.
Raspberry Pi Installation
To install CoAP on your Raspberry Pi, you need to build the environment. Follow the simple guide below.
- Make sure you have admin access (run as root)
- For the below script, you need to pre-install some tooling. Run the installation script below to install/validate make components:
sudo apt install autoconf automake libtool
- Below is the installation script. To run from the bash, execute the following commands, one-by-one
#!/bin/bash

git clone --depth 1 --recursive -b dtls https://github.com/home-assistant/libcoap.git
cd libcoap
./autogen.sh
./configure --disable-documentation --disable-shared --without-debug CFLAGS="-D COAP_DEBUG_FD=stderr"
make
make install
- Done. You have a new and shiny coap-client.
PC Installation
The PC installation is not so straightforward and guides have different approaches. Why are we doing this? If you just work with your Pi, skip this section. However we find it useful to debug scripts on Windows as well. The below is not really a full-fledged guide, but more some tips to get started.
Installing on Windows via WSL
WSL - Windows subsystem for Linux works for us best. We have a guide on how to use and install WSL here. So in a nutshell
- Setup WSL as described here
- Install Ubuntu as one of your WSL machines
- Run the script from the section Raspberry Pi Installation
- Navigate to your WSL bash and you're done: CoAP works like a charm
Installing CoAP via Docker
A great solution, if you have Docker available, or want to get started with Docker. We have a guide Docker on Raspberry Pi only, as we focus on the Pi. Give it a look anyway - there are some interesting Docker links available.
Installing Docker on Windows is well documented elsewhere. Try the official Docker guide to get started.
Once done, you can find many CoAP images. We tested for instance this one: webproject coap client. It's simply great, fits our needs and we don't want to develop our own image at this point in time. Pull the image and voilà, you're ready to use CoAP on (not only) Windows.