
Connecting the PIR sensor
We are going to describe how to plugin the PIR motion sensor and test it out. The inspiration for this part comes from an article Cheap PIR sensors and the Raspberry Pi which perfectly fits our projects. The article itself comes in 2 parts: first part is the wiring and basic features, second part adds finetuning the sensor settings.
Hardware Setup
A PIR module is a 5V "passive infra-red" sensor available for cheap from basically anywhere. They can be powered from 5V and output 3V so can be connected directly to pins on the Pi’s GPIO header without any other components.
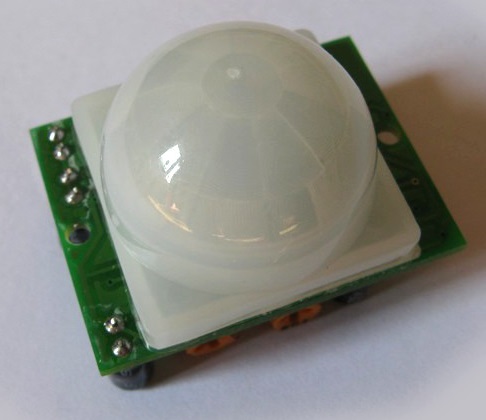
These modules are often referred to as PIR, "Passive Infrared", "Pyroelectric", or "IR motion" sensors. PIRs are basically made of a pyroelectric sensor, which can detect levels of infrared radiation. Everything emits some low level radiation, and the hotter something is, the more radiation is emitted. The sensor in a motion detector is actually split in two halves. The reason for that is that we are looking to detect motion (change) not average IR levels. The two halves are wired up so that they cancel each other out. If one half sees more or less IR radiation than the other, the output will swing high or low.
The plastic window covering may have multiple facets molded into it, to focus the infrared energy onto the sensor. Each individual facet is a Fresnel Lens.
The module sets a single output pin high whenever it detects movement within its field of view. It holds this pin High (3.3V) for a minimum period of time. If continuous movement is detected the output pin will stay High. When the time has elapsed and no more movement is detected the output pin returns Low (0V).
Connecting the PIR
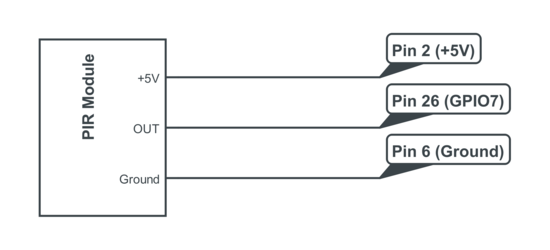
Here is a diagram showing the pin-out on the PIR module and how it is connected to the Raspberry Pi GPIO Pins:
The device has two variable resistors that you can adjust to tweak the behavior of the module.
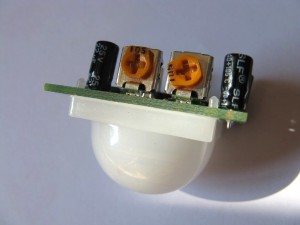
The first one (left-hand side on the photo) determines the sensitivity of the device. The default setting is usually 50%.
The second control (right-hand side on the photo and usually marked “time” on the PCB) allows you to adjust the amount of time the output pin stays at 3V (high) when it is triggered by movement. This can be set from a few seconds to 200 seconds. The default setting is usually a few seconds.
The units available online vary in specification but they are all very similar.
Python Script
The script for testing out the functionality of our setup is found below. It is a copy from our inspiration article Cheap PIR sensors and the Raspberry Pi (part 1).
#!/usr/bin/python
#+-+-+-+-+-+-+-+-+-+-+-+-+-+-+-+-+-+-+-+-+-+
#|R|a|s|p|b|e|r|r|y|P|i|-|S|p|y|.|c|o|.|u|k|
#+-+-+-+-+-+-+-+-+-+-+-+-+-+-+-+-+-+-+-+-+-+
#
# pir_1.py
# Detect movement using a PIR module
#
# Author : Matt Hawkins
# Date   : 21/01/2013

# Import required Python libraries
import RPi.GPIO as GPIO
import time

# Use BCM GPIO references
# instead of physical pin numbers
GPIO.setmode(GPIO.BCM)

# Define GPIO to use on Pi
GPIO_PIR = 7

print "PIR Module Test (CTRL-C to exit)"

# Set pin as input
GPIO.setup(GPIO_PIR,GPIO.IN)      # Echo

Current_State  = 0
Previous_State = 0

try:

  print "Waiting for PIR to settle ..."

  # Loop until PIR output is 0
  while GPIO.input(GPIO_PIR)==1:
    Current_State  = 0

  print "  Ready"

  # Loop until users quits with CTRL-C
  while True :

    # Read PIR state
    Current_State = GPIO.input(GPIO_PIR)

    if Current_State==1 and Previous_State==0:
      # PIR is triggered
      print "  Motion detected!"
      # Record previous state
      Previous_State=1
    elif Current_State==0 and Previous_State==1:
      # PIR has returned to ready state
      print "  Ready"
      Previous_State=0

    # Wait for 10 milliseconds
    time.sleep(0.01)

except KeyboardInterrupt:
  print "  Quit"
  # Reset GPIO settings
  GPIO.cleanup()
This script can also be downloaded onto your Pi directly using this command line:
wget http://www.raspberrypi-spy.co.uk/archive/python/pir_1.py
This can then be run using:
sudo python pir_1.py
When run the script waits for the output pin to go Low. It then prints a message to the screen every time the output state changes. This is either when movement is detected (output changes to High) or the device sees no movement (outout changes to Low).
Try changing the reset time by turning the “time” resistor clockwise by a few degrees. Run the script again, trigger the device and then wait to see how long it takes to go back to the ready state.
Python Script for configuring the sensor
The mentioned article has a second part which provides a great script for tweaking the settings of the PIR sensor. Basically it shows the response time (the time it takes the output pin to drop back to the low state. Very useful.
#!/usr/bin/python
#+-+-+-+-+-+-+-+-+-+-+-+-+-+-+-+-+-+-+-+-+-+
#|R|a|s|p|b|e|r|r|y|P|i|-|S|p|y|.|c|o|.|u|k|
#+-+-+-+-+-+-+-+-+-+-+-+-+-+-+-+-+-+-+-+-+-+
#
# pir_2.py
# Measure the holding time of a PIR module
#
# Author : Matt Hawkins
# Date   : 20/02/2013

# Import required Python libraries
import time
import RPi.GPIO as GPIO

# Use BCM GPIO references
# instead of physical pin numbers
GPIO.setmode(GPIO.BCM)

# Define GPIO to use on Pi
GPIO_PIR = 7

print "PIR Module Holding Time Test (CTRL-C to exit)"

# Set pin as input
GPIO.setup(GPIO_PIR,GPIO.IN)      # Echo

Current_State  = 0
Previous_State = 0

try:

  print "Waiting for PIR to settle ..."

  # Loop until PIR output is 0
  while GPIO.input(GPIO_PIR)==1:
    Current_State  = 0

  print "  Ready"

  # Loop until users quits with CTRL-C
  while True :

    # Read PIR state
    Current_State = GPIO.input(GPIO_PIR)

    if Current_State==1 and Previous_State==0:
      # PIR is triggered
      start_time=time.time()
      print "  Motion detected!"
      # Record previous state
      Previous_State=1
    elif Current_State==0 and Previous_State==1:
      # PIR has returned to ready state
      stop_time=time.time()
      print "  Ready ",
      elapsed_time=int(stop_time-start_time)
      print " (Elapsed time : " + str(elapsed_time) + " secs)"
      Previous_State=0

except KeyboardInterrupt:
  print "  Quit"
  # Reset GPIO settings
  GPIO.cleanup()
Again, the script can be downloaded directly to the PI using:
wget http://www.raspberrypi-spy.co.uk/archive/python/pir_2.py
The script can then be run using:
sudo python pir_2.py
You can use a small screwdriver to tweak the “time” control to increase or decrease the time. Once you’ve triggered the module it is important to stay still so you don’t increase the time the output stays High which will mess up your results.
A half turn will result in the reset time being increased by a few minutes so it’s best to make adjustments in small increments.
Links
Our sensor articles:
- RCWL 0516 Microwave Radar Sensor- motion detection sensor (microwave - radar)
- BME680 Sensor and BME680 Breakout Board - temperature, pressure, humidity, air quality sensor