
Summary
You can develop Python and other code (Ruby, Javascript etc.) the old-fashioned way. Works and is efficient. You can also try to develop on your Raspberry Pi via your browser from any machine - awesome. Enter adafruit webIDE.
Introduction
Learn more about the adafruit webIDE from their own site,
The Adafruit WebIDE is by far the easiest way to run code on your Raspberry Pi or BeagleBone. Just connect your Pi or BeagleBone to your local network, and log on to the WebIDE in your web browser to edit Python, Ruby, JavaScript, or anything and easily send it over to your Pi. The WebiDE includes a terminal, so you can easily send various commands to your Pi right from the browser. Also, your code will be versioned in a local git repository, and pushed remotely out to bitbucket so you can access it from anywhere, and any time.
Don't forget to check the installation video and highlights on YouTube
Installation
Installation procedure is perfectly documented on the adafruit webIDE site, so here is an annotated copy - development has run ahead of the documentation in some places.
Installation of the editor can be performed in two ways. One is the more trusting, but much easier way, the second is a bit more manual.
Easy installation
-
Log into your Raspberry Pi. If you're on a Mac, you can open Terminal.app to log into the Raspberry Pi over SSH. Linux users can open the default terminal application. If you're using Windows, you'll want to download a good terminal application - try MobaXterm, it just rocks (or read more about Remote Access to Raspberry Pi).
-
Once logged in, you can copy and paste the following command, and hit enter. This command will download an install.sh script from the adafruit github repository, and execute it automatically for you.
curl https://raw.githubusercontent.com/adafruit/Adafruit-WebIDE/alpha/scripts/install.sh | sudo sh
The editor will be installed into /usr/share/adafruit/webide using the user webide. The script will install node, npm, redis-server, git, restartd (watches over your editor server), avahi-daemon (bonjour!), i2c-tools, and libcap2-bin (so we can use port 80 without root). If you'd like to review the script, it's located here.
The installation may take from 3-5 minutes, so please be patient.
- After the installation is complete, you'll see the following prompt:
**** Starting the server...(please wait) ****
**** The Adafruit WebIDE is installed and running! ****
**** Commands: sudo service adafruit-webide.sh {start,stop,restart} ****
**** Navigate to http://raspberrypi.local to use the WebIDE
The editor is now installed, and you can open a browser to access it from any computer in your network. The only browsers that are supported are Google Chrome, and Mozilla Firefox at this time.
Manual Installation
You can manually install the editor by running the following set of commands:
sudo apt update && sudo apt -y install build-essential nodejs nodejs-legacy npm redis-server git
git clone git://github.com/adafruit/Adafruit-WebIDE.git
cd Adafruit-WebIDE
mkdir tmp
npm config set tmp tmp
npm install
editor config/config.js (change port 80 to your port of choice)
nodejs server.js
Uninstalling
- To uninstall the editor for versions 0.1.9 and older, you can run the following script:
curl https://raw.githubusercontent.com/adafruit/Adafruit-WebIDE/release/scripts/uninstall.sh | sh
- To uninstall the editor for versions 0.2.0 and newer, you can run the following script:
curl https://raw.githubusercontent.com/adafruit/Adafruit-WebIDE/alpha/scripts/uninstall.sh | sudo sh
-
You can also manually uninstall by removing the following components:
- Delete the folder the editor exists in.
- Remove the bitbucket ssh keys in ~/.ssh
- Edit the ssh config to remove the bitbucket reference that is appended.
- Uninstall nodejs npm redis-server git restartd libcap2-bin avahi-daemon i2c-tools.
Installation tips
-
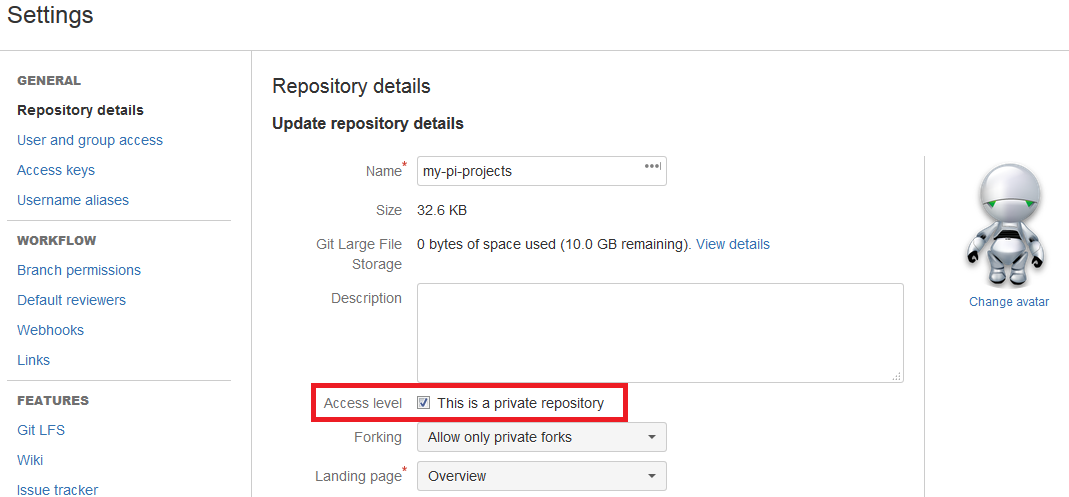
Before you start the IDE for the first time, figure out how you want to setup your source code repository. adafruit webIDE binds by default to BitBucket, which is of course a perfectly good choice. Just figure out if you want to use your existing repo or start a new one, perfectly matching your Pi development. A good choice at this point in time helps you organize stuff better.
-
Once adafruit webIDE is running and connecting to BitBucket, a window pops up telling you to 'make sure you have a private repository'. The guide in this window is not valid anymore, as BitBucket has changed in the meantime. Here is where to find the privacy configuration:
Links
Always read more Python related topics on our main Python page.