Introduction
This section shows an example on how to easily confiugure a RasPi as a IoT device for temperature monitoring. We will be using a DS118b20 sensor for temperature readings and Node-RED for set-up of the monitoring dashboard.
Material needed
Besides a RasPi you will need the following: * DS18b20 sensor * 4,7-10 kOhm resistor * Breadboard for connections. (optional, but makes life a lot easier) * Jumper wires
Step 1 - RasPi IoT set-up
Start by following the excelent instructions given in the IoT Raspberry Pi Device section.
Step 2 - Connection of sensor
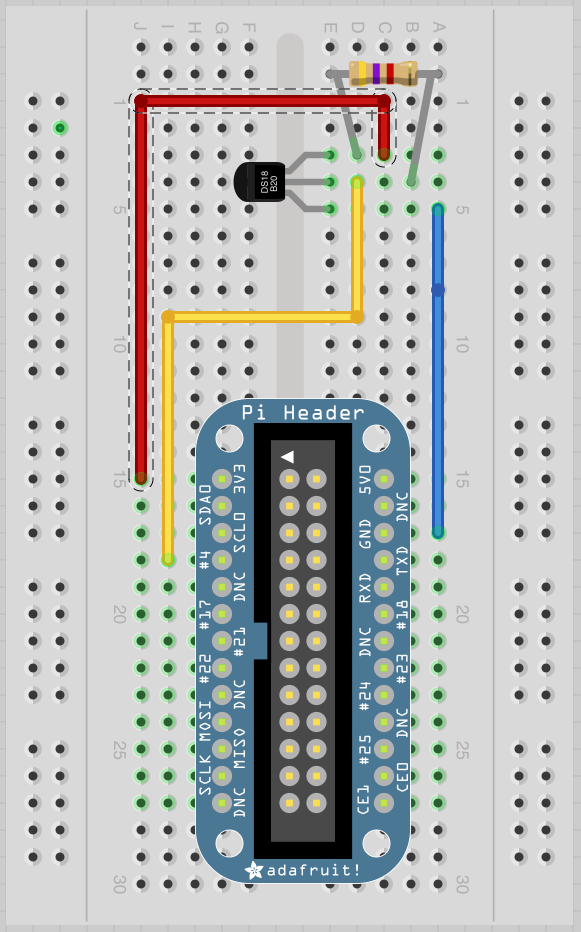
Connect the DS18b20 sensor and the resistor according to the picture below. The picture shows use of the Adafruit GPIO Extension board but can be used as reference for connecting to other extension boards or to RasPi GPIO directly. Take care to connect the power supply and ground to the correct pins. If wrongly connected the senor will get hot within short and eventually damaged.
Step 3 - Set up RasPi to read temperature
First of all we need to modify /boot/config.txt. Start a SSH session and open the file by the following command:
sudo nano /boot/config.txt
Scroll to the bottom of the file and add this line:
dtoverlay=w1-gpio
Save and exit the editor and reboot:
sudo reboot
Once rebooted and logged in SSH again, give the following commands:
sudo modprobe w1-gpio
sudo modprobe w1-therm
cd /sys/bus/w1/devices
ls
The ls command will give you a print out of available devices (sensors). The temperature sensor will have a serial number similar to 28-0216223e62ee. Now try to read temperature data by:
cd 28-0216223e62ee (change this to match what serial number pops up)
cat w1_slave
If everything is working you should get a reply like this:
88 01 4b 46 7f ff 0c 10 4d : crc=4d YES
88 01 4b 46 7f ff 0c 10 4d t=24500
The figure after t= shows the temperature reading, in this case 24.5 degrees Celsius. You can warm up the sensors with your fingers and re-run the cat w1_slave command to check that the sensor is working.
Step 4 - Node-RED setup
Start by installing a Node Red node to manage connection to DS18B20 sensors. Navigate to your Node-RED user directory and install the DS18b20 Node.
cd ~/.node-red
npm install node-red-contrib-ds18b20-sensor
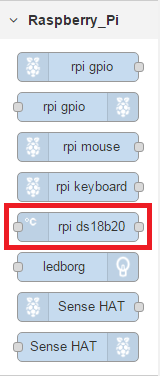
Reboot the RasPi. Open a browser on your computer and browse to your RasPi Node-RED site, e.g. http://192.168.1.165:1880 (replace the IP idress with the one that your RasPi has in your network). You shall now find a new node in the RasPi section:
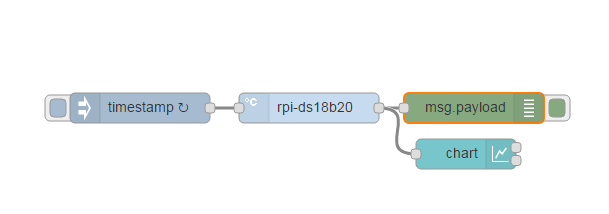
Use this block and build a flow similar to this:
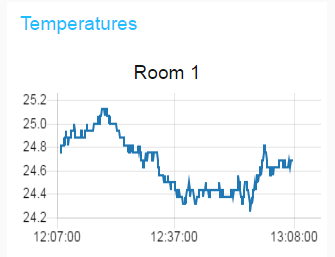
Set the Timestamp node to periodic mode with a suitable period. Add a new tab and group to the Dashboard (found in the right pane). Assign the graph node to this group and deploy.
Now you will find your temperature graph at this dashboard adress e.g. http://192.168.1.165:1880/ui/